The Dock and Boat Lift Inspection
The Pile and Seawall Inspection
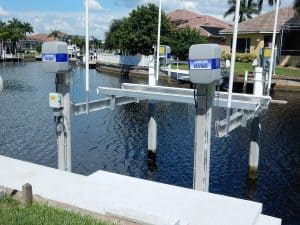
Start by examining your pilings, dock structure, and/or seawall. Your boat lift is only as strong as the foundation that supports it. If your pilings or dock structure show signs of damage, you should repair them before the weight of your boat and lift cause a catastrophic failure.

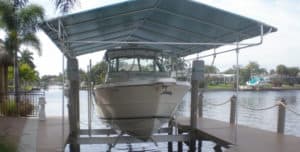
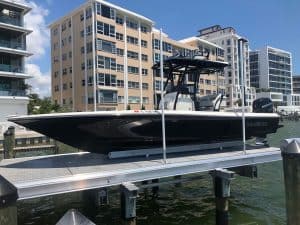
Top Beams Inspection
Next, examine the structure of your top beams. If your boat lifts top beams were made from galvanized steel, you should carefully look for rust. Unfortunately, the galvanized coating comes off easily and the steel will begin to rust. Galvanized steel can rust completely through the metal compromising the structural integrity of your boat lift. At the first signs of rust, you should clean it off and apply a protective coating to the steel.
Unlike steel, aluminum only surface oxidizes. The surface layer of aluminum oxide forms a protective coating preventing further oxidation of internal aluminum molecules, which allows aluminum beams to maintain their structural strength. Because aluminum does not rust through and only surface oxidizes, most modern boat lifts use aluminum for their structural beams. Although you may not like the patina look of oxidized aluminum, you can rest assured that your aluminum beams are structurally sound and protected from internal rusting.

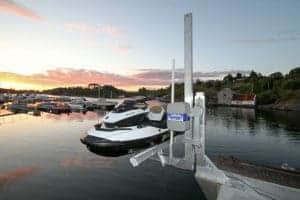
Next, you need to examine your lift’s top beam structure for galvanic corrosion.
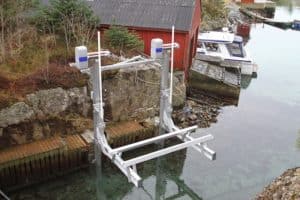
It is fairly common to see signs of galvanic corrosion where stainless steel hardware touches the aluminum top beams. The amount of corrosion shown in image 3 is primarily cosmetic and not much to be concerned about. However, image 4 shows a case where the corrosion has damaged the aluminum winder nearly to the point of failure.

In both cases, occasionally rinsing the boat lift with fresh water will help minimize galvanic corrosion.
Powerheads Inspection
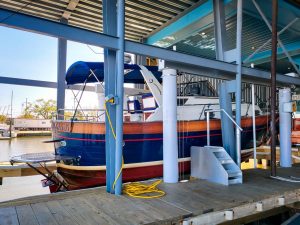
One of the most important things to inspect are your powerheads. Make sure that your gearbox and motors have not been damaged in a collision, or by the environment.
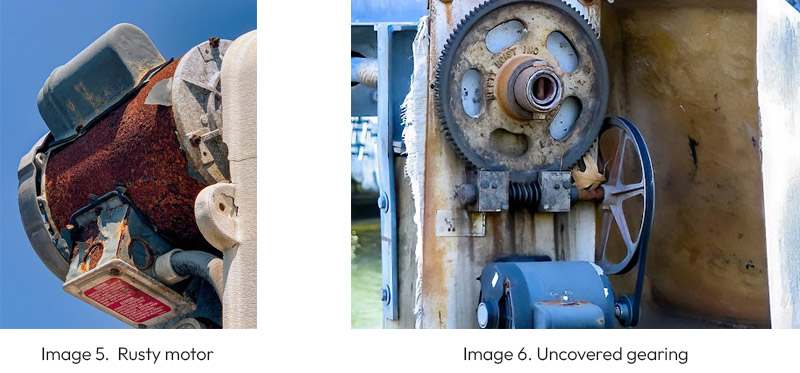
One of the best ways to protect your powerheads is to keep them under a cover (See the post “Benefits of a Covered Drive” to learn how our covers protect your powerheads from more than just the elements.). That is why IMM Quality Boat Lifts covers all our powerheads.


Cradles and Bunks Inspection
Moving down the boat lift structure, carefully inspect the boat lift cradles and bunks. Look for signs of corrosion on the support beams as well as the brackets that support guide posts or bunks. If you have carpeted wood bunks, examine the carpet for signs of wear.
Lift Cables Inspection
Lastly, inspect your lift’s cables. Ultimately, the cables support the entire weight of your boat. Carefully inspect the cables for signs of damage and wear. We recommend replacing your cables every two years or 200 up and down “cycles”, whichever comes first.

One of the best ways to protect your cables and extend their usable life is to own a boat lift that uses grooved aluminum cable winders. Aluminum is softer than the steel of the cables, which will help minimize metal-on-metal abrasion to the cables. The grooved winders also neatly wind the cable, preventing cable on cable wraps and helping to prevent the types of damage shown in Image 10.

If you determine that the lift’s cables need to be replaced, please visit this post “Installing a new boat lift cable” for helpful advice on the process.
Special Considerations for Elevator Lifts
Elevator lifts have additional maintenance concerns. They have permanently installed tracks in the water that the carriage rides on. Because these tracks are always in the seawater, they are especially susceptible to corrosion.

To minimize your risk of corrosion, we recommend installing sacrificial Zinc anodes to the elevator tracks. Zinc is chemically more active than aluminum, therefore the zinc anode will corrode away before galvanic corrosion begins attacking the aluminum tracks. Frequently check, and replace worn zinc anodes to minimize the effects of galvanic corrosion on the tracks.

Failure to maintain the sacrificial zinc anodes may result in significant galvanic corrosion. The following image shows an elevator track, carriage arm and support brackets that suffered severe galvanic corrosion that could have been minimized by maintaining the sacrificial zinc anodes.

Lubricate Lubricate Lubricate!
To keep your boat lift working properly, you must make sure that all the moving parts are properly lubricated. Lubricate the powerheads. Consult your owner’s manual to determine what parts of your boat lift’s powerhead require lubrication. Our Alumavator and Superlift powerheads have sprockets and chains that require lubrication every six months.

If you are willing to take the cover off, we recommend wiping on a thin layer of marine grade grease over the entire sprocket and chain. However, we have made an easier solution that does not require the removal of the cover. On the back side of the powerhead plate, we have made an access port to lubricate the chain and sprocket. While running the lift down, take the red plug out of the hole and apply chain and cable spray lubricant onto the chain.

Our Platinum lifts were designed to be low maintenance. The Platinum powerheads use a double reduction direct drive gearbox. The gearboxes were filled with lubricant and sealed at the factory. Therefore, no lubrication is necessary during routine maintenance.

Lubricate the drive pipe bearings
One of the most important, and time-consuming, components of a boat lift to lubricate are the drive pipe bearings. Typically, these bearings have zerk grease fittings for a grease gun to lubricate the bearing. Most boat lifts have 4-5 drive pipe bearings per top beam that require lubrication, but you also need to check your powerheads because they sometimes have zerk fittings for lubrication.

Zerk Grease Fittings
To fill the bearings with grease, attach the grease gun hose to the zerk fitting and pump in grease until you see some squeeze out between the drive shaft and bearing. Repeat this process for each drive pipe bearing.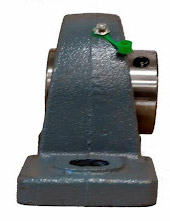
In order to ensure good grease distribution, you should rotate the drive pipe and pump in more grease at each bearing. You should repeat the rotation and greasing process two more times and then move on to the second top beam.
The manufacturers recommend lubricating these bearings at least once every six months. Rain can wash away some grease, but the biggest problem is that the heat and the sun rays degrade the grease and cause it to solidify. Solidified grease is very difficult to remove and it can block the zerk fittings, making it very difficult to lubricate your lift.

IMM Quality Boat Lifts Solution
What if you don’t like all that grease squeezing out of the bearings and dripping on to your boat, the dock and into the water? What a mess! What if you don’t feel like lubricating your drive pipe bearings every six months?
IMM Quality Boat Lifts understands completely. That is why we use self-lubricating tribopolymer bushings in all of our drive pipe bearings. This space age material was developed by NASA for the shuttle program because grease bearings make no sense in outer space. Our drive pipe bearings have no zerk fittings, no need for grease and no need for any other maintenance. By using this revolutionary material in all of our models we help save you time and money by reducing maintenance costs.

Lubricate the Pulleys / Sheaves
Another time-consuming task is the lubrication of the boat lift’s sheaves/pulleys. Typically, the pulley bearing has a zerk grease fitting to lubricate between the shaft and pulley. The number of pulleys will depend on how many parts the cable system contains (cable drops straight down (1 part), the cable comes down goes around a pulley, and then back up (2 parts), etc.) The pulleys may be located on the cradles or the top beams. All the pulleys will require lubrication at a minimum of every six months.

The pulley on the right in image 21 was not properly lubricated and has seized so that it no longer turns. Now when you lower or raise the lift, the cables saw into the metal of the pulley and will cause tremendous abrasion damage to the cables. If this pulley is not replaced quickly, the cables will snap.
Even if your pulleys have not seized, forgetting to lubricate them will cause abrasion wear. Image 22 shows pulley axles worn away and the damage that a lack of lubrication may cause to your pulleys.

What if you don’t have time to lubricate your sheaves/pulleys every six months? What if you forget?
We are all busy, trust us, we get it. That is why we use self-lubricating tribopolymer bushings in all of our sheaves/pulleys. Just like our drive pipe bearings, our pulleys do not require lubrication and never need any maintenance. By using the best materials available in the pulleys in all of our models we help save you time and money by reducing maintenance costs.

Conclusion
Owning a boat lift makes cleaning and maintaining your boat a much easier task, but don’t neglect to maintain your boat lift as well.

We hope you found this guide helpful and edifying. By showing you some of the things that can go wrong if you neglect to perform routine maintenance, we hope that you will make your boat lift’s maintenance a priority.
We also hope that we have convinced you that maintaining an IMM Quality boat lift is much easier than with the competition. Our lifts were engineered to make the user experience as easy and enjoyable as possible. By only using the best possible materials, we will save you time and money by reducing the amount of maintenance you need to perform on your lift. That way you will be able to get back out on the water and enjoy yourself.
If you have any questions or need any advice about your boat lift maintenance, please don’t hesitate to call us at (800) 545-5603. Also, if you need any parts for your maintenance, our sales team will make sure that you get what you need.
Happy Boating!