blog install boat lift

Installing a Boat Lift Cable

Boat lift cables are important components in a boat lift. They can encounter catastrophic failure when you do not install them correctly or when you do not maintain them well. With the different sizes, models, and brands of boat lifts on the market, it is appropriate to consult a professional and licensed boat lift technician before you buy or install a new boat lift cable.
If your boat lift needs new cables, you might be curious about how to properly install them or how the boatlift technicians will do it for you.
This article defines a boat lift cable, introduces the types of boat lift cables, guides you on the right installation procedure, and lists important tips for maintenance.
blog install boat lift1

What is a Boat Lift Cable?

Boat lift cables, also called hoist wires or cables, connect the lifting mechanism to the cradles that pick up the boat. They allow the boat or watercraft to be lowered and raised whenever you need them.
The lift cables will always wear down with time and will need to be replaced.  It does not matter what type of lift cable you choose as they will wear out with time. The duration before you replace the cables will depend on the type of cable, the type of lift, performance of proper maintenance and how often you use the lift. Replacing worn lift cables is a necessary part of owning a boat lift, like changing the tires on your car.

Types of Boat Lift Cables

There are many types of boat lift cables. Some are made from galvanized steel cable while most boat lifts use 300 series stainless steel cable. Lift cables also differ in their construction and can vary in diameter as well as the number and orientation of strands used in their construction.

Galvanized Cable

Galvanized cable is more flexible and softer when compared to stainless steel cable. This makes galvanized cable more resilient to work hardening (the process where metal will break after it is repeatedly bent) and to abrasion damage. The major problem with galvanized cable is that the galvanized coating does not provide adequate protection against cable corrosion. This means you should not use the galvanized cable in salt water or submerge it for long periods in freshwater.
Although the galvanized cable has problems with rust, it is more affordable than stainless steel cable. This makes it an excellent option for freshwater boat lifts.

Stainless Steel Cable

When compared to galvanized cables of similar size, stainless steel cables can not lift as much weight. This results in stainless steel cables costing more than galvanized cables with the same weight rating. A stainless steel cable is an excellent option for saltwater boat lifts since it has better corrosion resistance than galvanized steel. The problem with stainless steel is that it is more prone to work hardening and abrasion damage. There are different grades of stainless steel cable. 304 stainless is more flexible and wear resistant than 316 stainless which has the highest corrosion resistance. It is a good idea to regularly check stainless steel cables for broken strands by gently feeling along the length of the cable while exercising lots of care to avoid cutting yourself.

Cable Construction

Boat lift cables also differ in their construction. Cables with larger diameters will be able to carry more weight. Typical boat lift cables come in 5/16″ and ⅜” diameters. Cables can be made with different strand configurations. Two common configurations used with boat lift cables are 7 x 19 and 6 x 36 construction. For a given diameter, the 6 x 36 construction will have thinner strands which will result in a more flexible cable.
blog install boat lift2

How to Install Boat Lift Cables

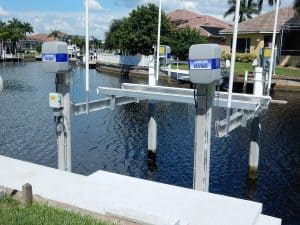
The boat lift cable installation process relies heavily on the type of boat lift you own. We highly recommend having a professional marine contractor install the replacement cables. They have the experience and access to specialized equipment that make the job safer and easier. For your knowledge and to assist the marine contractor please
  • Identify the type of boat lift at your home, then obtain the owner’s manual, installation manual and product specification sheet from the manufacturer. If you own an IMM Quality Boat Lift, please call (800) 545-5603 and ask to speak with technical support if you have any questions.
  • Please read the pertinent information from these documents and make sure that you fully understand the steps.
If you choose to perform the work yourself, here is a step-by-step guide on how to install a replacement boat lift cable.
    1. Obtain the correct size and length of replacement cables for your specific boat lift from the manufacturer.
Image A. The IMM Quality Boat Lift’s replacement cable comes with a fused end and a copper stop on the other end.
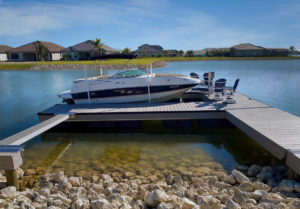
    1. Remove the boat / watercraft from the boat lift.
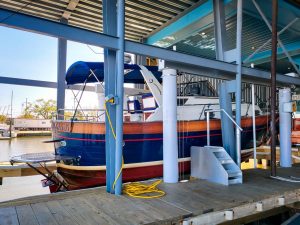
    2. Secure the cradle beams. We recommend using nylon strapping to tie the cradle beams to the top beam channel. Some marine contractors will use chain or other strapping, while others will use their barge to support the cradle beams and bunks.
Image B. During a cable replacement, the cradle beams were held above the water using chains.
    1. With the cradle beams secure, cut and remove the worn lift cables.
    2. When installing the new cable, it is easiest to start at the cable winder. The IMM Quality Boat Lift cable winder is drilled with two holes, one larger and one smaller, in line with each other. Insert the fused end of the cable into the larger hole and then through the smaller hole. Continue to pull the fused end of the cable through the winder until the copper stop bottoms out on the smaller hole.
Image C. Looking down at the IMM Quality Boat Lifts cable winder to show the two in-line holes with the larger hole towards the top (closest to viewer) of the winder.
    1. Route the cable according to the cable routing diagram provided by your manufacturer.
Image D. The cable routing diagram for an IMM Quality 10,000 pound beamless boat lift.
    1. Repeat steps 4-6 for the remaining cables. On a typical 4 post lift, each lift will have four sets of cable, two for each top beam, one for each winder. Elevator lifts only have two sets of cables, one for each powerhead.
    2. When all of the new cable has been installed, you may remove the support strapping. Allow the cradles to drop gently into the water and come to a rest on the sea bed.
    3. Raise the lift, watching to make sure that the new cable is winding properly on all of the winders. Continue to raise the lift until the cradles are out of the water.
    4. IMM Quality Boat Lifts use the patented wedge lock. The wedge lock allows you to easily adjust the cable length. Our competitors’ cables terminate with copper stops or loops attached to shackles which do not allow adjustment.
Image E. Adjusting cable length is easy with the wedge lock, whereas our competitors use non-adjustable cable terminations
  1. Use the wedge lock to adjust the cable length so that the cradle beams and bunks are level. Simply loosen the internal wedge to feed cable through in either direction. When the cradles are level, pull down on the cables to lock the wedge, securing the cable.
  2. Run the lift up and down a few times. Watch and listen carefully. You want to make sure that everything is working properly with the boat lift. Do not load a boat onto the lift until you are satisfied that everything is working properly.
Congratulations! You are all finished. You may lower the lift and put the boat back on.

Necessary Precautions to Take When Installing New Boat Lift Cable

  • Ensure you work in a safe manner at all times
  • Ensure you only use the right equipment and tools
  • Follow only the relevant instructions and drawings
  • Please review the installation to ensure it is complete and well done

Common Problems During the Installation of a Boat Lift Cable

If you install the lift cables improperly or hastily, you will likely encounter many problems with the boat lift. Make it a habit of inspecting everything when you are done with the installation. In most cases, un-smooth movements or unusual sounds will be a red flag that will enable you to detect a problem that needs to be corrected. The most common problem experienced during installation is that the cables are not wrapping properly on the winder. The cables should wind neatly and tightly within the grooves of the winder. If you notice any backlash (tangle) with the cable, do not try to remove it with your hands. Trying to fix backlash with your hands puts you at serious risk for injury. Simply lower the cradles, until the backlashed cable is off the winder, then slowly raise the cradles making sure the cable is winding properly.
Image F. Save your fingers! Do not try to fix backlash by pulling on the cable with your hands.
If you don’t have an IMM Quality boat lift, the most difficult part of cable installation is getting the cradles and bunks level. Most boat lift manufacturers use cables that terminate with a loop. This loop connects with a shackle, which does not allow adjustment of the cable length, making leveling your cradles very difficult.
Image G. Replacement cable with loop end. As shown on the right, the loop is attached to a “D” shackle on the boat lift.
To level the cradles on our competitor’s lifts, you need to adjust the cable length at the winder. First, you need to run the lift all the way down, so that all the cable is off the winder. Some lifts use copper stops to secure the cable to the winder and others use wire rope clips. To shorten the cable length you have to: 1. Cut of the copper stop, pull the required length of cable through the hole in the winder, put a new copper stop at the right location and crimp it securely in place, or 2. Loosen the wire rope clip, pull the required length of cable through the hole in the winder, tighten the wire rope clip to hold the cable in the new position. As you can clearly see, the patented IMM Quality Boat Lifts wedge lock makes adjusting cable length to level the cradles much easier.

Maintenance Practices after Installation of New Boat Lift Cable

After you are finished with the new cable installation, you need to make sure that you maintain them. Proper maintenance of the new boat lift cable will ensure it functions well and will prolong its lifespan.
The most important thing to do is to routinely inspect the cables for signs of damage or wear. You do not want to see any signs of rust, kinks, broken strands or any other irregularities. To help protect the strands of the cable, you can use a penetrating chain and cable spray lubricant. This will protect the internal strands from abrasion wear as well as the outer strands from corrosion.
You should also make sure that any pulleys are turning freely. Cables sawing against seized pulleys will cause great damage that may result in a catastrophic break. Frequently rinsing your lifts moving parts with fresh water to remove salt deposits will help prevent the pulleys from seizing. IMM Quality Boat Lifts uses self-lubricating bushings so no maintenance lubrication is needed with our pulleys. However, most manufacturers use pulleys that require lubrication with grease.
Even if there are no signs of wear and tear, we recommend replacing the lift cables every two years or after 200 up and down cycles, whichever comes first.

Conclusion

We hope you found this guide helpful and informative. By showing you the steps needed to install new lift cables, we hope that you will make your boat lift’s maintenance a priority.

We also hope that we have convinced you that maintaining an IMM Quality boat lift is much easier than with the competition. Our lifts were engineered to make the user experience as easy and enjoyable as possible. By only using the best possible materials, we will save you time and money by reducing the amount of maintenance you need to perform on your lift. That way you will be able to get back out on the water and enjoy yourself.

If you have any questions or need any advice about your boat lift maintenance, please don’t hesitate to call us at (800) 545-5603. Also, if you need any parts for your maintenance, our sales team will make sure that you get what you need. IMM Quality Boat Lifts. Built for a Lifetime!

Happy Boating!

Frequently Asked Questions (FAQs) about Installing a Boat Lift Cable:

A boat lift cable is a wire or cable that connects the lifting mechanism to the cradles, allowing the boat to be raised or lowered as needed.

Boat lift cables can be made from galvanized steel or stainless steel, with different constructions like 7x19 or 6x36, affecting their flexibility and strength.

The installation process varies depending on the type of boat lift, but it generally involves securing the cradle beams, removing old cables, and routing new cables according to the manufacturer's diagram.

Safety is paramount, so use the right equipment, follow instructions carefully, and ensure the installation is complete and secure.

Regularly inspect the cables for damage or wear, lubricate them to protect against corrosion and abrasion, and replace them every two years or after 200 cycles.

SEARCH OUR SITE

Popular Posts

Recent News

Boat Lifts

General Interest