Elevate Your Water Adventures: Exploring Boat Lifts for Small Boats, Kayaks, and Personal Watercraft

elevate your water adventures cover image

When it comes to watercraft ownership, boat lifts are an essential investment for individuals who own small boats, kayaks, or personal watercrafts. These ingenious systems not only provide convenience but also offer numerous benefits such as protection against water damage, increased longevity of vessels, and hassle-free maintenance. In this article, we will explore the world of boat lifts, their types, advantages, and considerations for choosing the right one for your small watercraft.

1. The Importance of Boat Lifts

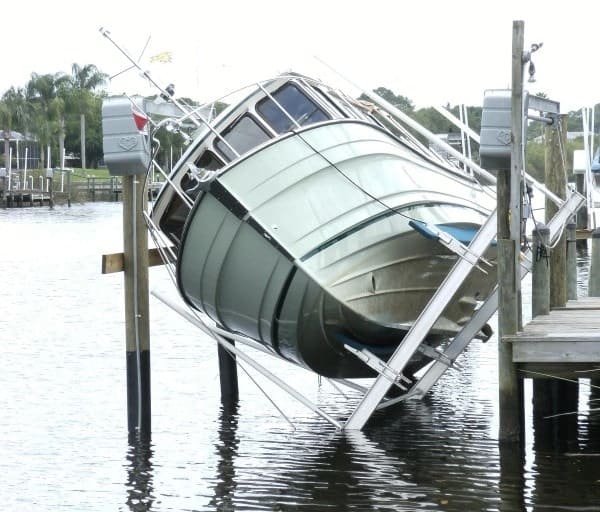
Owning a small boat, kayak, or personal watercraft often means dealing with the challenges of storage and maintenance. Boat lifts offer an effective solution by raising your watercraft out of the water when not in use. This elevation eliminates concerns related to exposure to marine growth, hull damage caused by floating debris, and the corrosive effects of saltwater. By keeping your vessel out of the water, you can significantly extend its lifespan and reduce maintenance costs.

2. Types of Boat Lifts

Boat lifts come in various types, each designed to cater to specific watercraft and docking situations. The most common types for small boats, kayaks, and personal watercraft include:

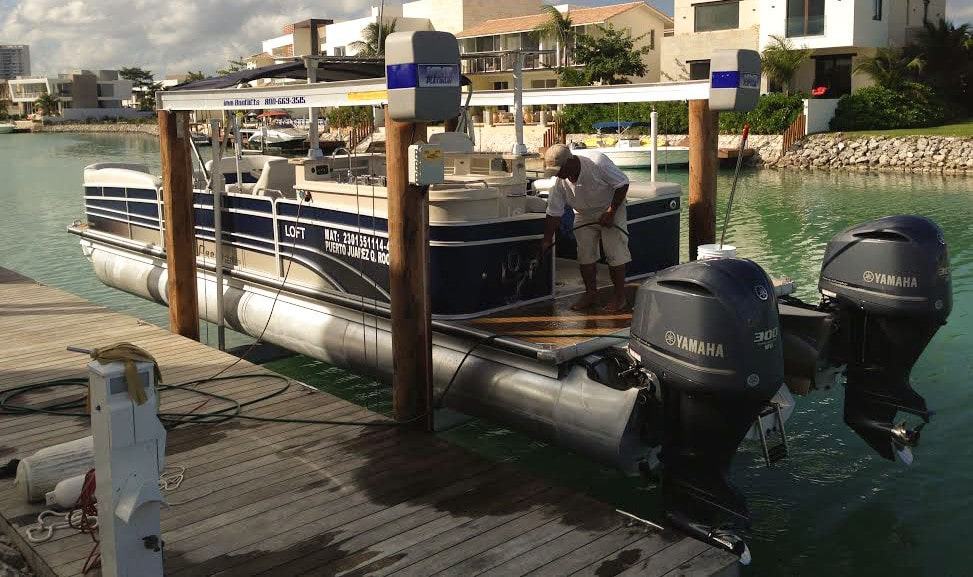
a) Vertical Boat Lifts: Ideal for small boats and watercraft, these lifts elevate the vessel straight up out of the water, saving space and allowing easy access for boarding.

boat on lift during hurricane,boat on lift during hurricane season,what to do with boat during hurricane

b) Floating Dock Lifts: Designed for kayaks and personal watercraft, these lifts feature a floating platform that supports and raises the watercraft out of the water. They are versatile and can adapt to changing water levels.

boat on lift during hurricane,boat on lift during hurricane season,what to do with boat during hurricane

c) PWC Lifts: Specifically designed for personal watercraft, these lifts often come with adjustable bunks or cradles to secure the watercraft. They are compact, easy to use, and protect your valuable personal watercraft from the elements.

boat on lift during hurricane,boat on lift during hurricane season,what to do with boat during hurricane

d) Dual PWC Jet Ski Lifts: For those who own multiple personal watercraft, a dual PWC jet ski lift is an excellent solution. These lifts are specifically designed to accommodate two jet skis simultaneously, providing efficient storage and easy access to both watercraft. Dual PWC lifts come in various configurations, including side-by-side lifts or lifts with a shared platform.

boat on lift during hurricane,boat on lift during hurricane season,what to do with boat during hurricane

e) Kayak Lifts: These lifts are designed to provide a simple solution for getting kayaks in and out of the water quickly. We have three generations of engineering experience, which has been utilized to create kayak dock lifts that are user-friendly, space-efficient, and durable enough to last a lifetime.

boat on lift during hurricane,boat on lift during hurricane season,what to do with boat during hurricane

f) Ascension Stair Lift: This revolutionary lift offers convenient water access with an adjustable height boarding platform attached to a set of stairs with self-leveling steps. The boarding platform is capable of going both above and below your deck height.

boat on lift during hurricane,boat on lift during hurricane season,what to do with boat during hurricane boat on lift during hurricane,boat on lift during hurricane season,what to do with boat during hurricane

3. Advantages of Boat Lifts for Smaller Watercrafts

Investing in a boat lift offers a multitude of advantages for small boat, kayak, and personal watercraft owners:

  1. Protection from the Elements: Boat lifts keep your watercraft safely elevated, protecting them from damage caused by wind, waves, and harsh weather conditions.
  2. Easy Access and Docking: With a boat lift, launching and docking your watercraft becomes a breeze. You can quickly and conveniently access your vessel without the need for ramps or trailers.
  3. Reduced Maintenance: By keeping your boat or watercraft out of the water, you can minimize maintenance requirements such as cleaning, painting, and bottom maintenance, saving both time and money.
  4. Increased Security: Boat lifts deter theft and unauthorized use, as your watercraft is securely elevated out of reach when not in use.

4. Choosing the Right Boat Lift

Selecting the appropriate boat lift for your small boat, kayak, or personal watercraft is crucial. Consider the following factors before making a purchase:

  1. Weight Capacity: Ensure the lift can safely support the weight of your watercraft. You can use our handy Boat Lift Capacity Calculator to help determine the best boat lift for your watercraft.
  2. Size and Dimensions: Choose a lift that accommodates the length, width, and height of your vessel.
  3. Water Conditions: Take into account the water depth, current, and fluctuation when selecting a boat lift to ensure stability and functionality.
  4. Ease of Use: Look for lifts with user-friendly features such as remote controls, automatic leveling, and adjustable settings for convenience.

Conclusion

Investing in a boat lift is a wise decision for small boats, kayaks, and personal watercraft owners. These lifts provide numerous benefits, including protection against damage, reduced wear and tear, along with just making it more enjoyable to use your watercraft. If you need help choosing the best boat lift for your requirements, don’t hesitate to contact us.

How to Prepare your Boat and Dock for Hurricane Season

how to prepare your boat and dock for hurricane season

The key to protecting your boat and home from hurricanes is to get prepared well in advance of any threatening weather.

Hurricane season should be taken seriously, especially if you live on the Eastern seaboard or the Gulf of Mexico. Hurricane season starts June 1st and lasts until the end of November. While there is nothing you can do to prevent a hurricane from occurring, there are a number of preventative measures you can take to prepare your boat and dock for the conditions they may be exposed to during a tropical storm or hurricane.

Check Your Seawall

boat on lift during hurricane,boat on lift during hurricane season,what to do with boat during hurricane
By Sea Me Dive

Take a look at your seawall during low tide. If you notice any cracking, shifting or leaning of the seawall, bowing, or erosion of the ground around the seawall, it is best to get it inspected by a professional marine contractor. There are certain types of cracks which are just cosmetic. However, it takes a trained eye to know when the structural integrity of the seawall has been compromised.

Have Your Dock Inspected

boat on lift during hurricane,boat on lift during hurricane season,what to do with boat during hurricane
By Ray Ewing

If your dock is old or in bad condition, it may not be able to withstand the high winds and rough waters during severe weather. The integrity of your boat lift is only as good as the underlying structure. It is a good idea to have your dock and pilings inspected by a professional to make sure they are in good condition and will not break apart and damage your boat, house, or surrounding structures.

Make sure your home is prepared

boat on lift during hurricane,boat on lift during hurricane season,what to do with boat during hurricane

The most important thing is to have an emergency preparedness plan for your family. For help creating an emergency preparedness plan, you can consult this really good guide. Next, you will want to secure your home before an impending storm hits. It goes without saying that you should install your hurricane shutters (or board up windows), sandbags and other safety devices. There are many obvious precautions to take when it comes to things outside your home. For instance, you’ll want to bring in outdoor furniture, potted plants, and anything else that may blow away in the wind or potentially harm your home or neighbors’ homes. You should think about the specific needs of your family and then assemble a disaster supplies kit.

Make Sure Your Boat is Prepared

boat on lift during hurricane,boat on lift during hurricane season,what to do with boat during hurricane
By BoatU.S.

The first thing to do is to secure your essential documents in a safe location on dry land. You will want to have photos of your vessel and home, an inventory of items in your home, an inventory of equipment on your vessel, contact phone numbers including your insurance company, copies of your insurance policies, a copy of your vehicle registrations and any other documents you deem essential. Next, you should turn off the boat’s electrical system and remove the battery. Remove any detachable equipment from the vessel to prevent breakage (such as radios, sails, canvas, cushions, dinghies, and other equipment). Lash down anything that can’t be removed, such as wheels, tillers, and booms. To prevent chafing, wrap protective covering around your lines wherever the ropes touch the boat. Seal off all windows, doors, and hatches. Finally, make sure to shut off your boat’s fuel lines.

Make Sure Your Boat is Stored Properly

To prevent or minimize damage to your boat, you must make sure it is stored properly. While the best solution is to relocate the vessel out of the storm area, this may not be practical based on personal safety factors and limited availability of time and resources. Taking it to storage on dry land, if you have that option available, will be the next safest option as the vessel will be protected from rough water and storm surge. As a rule, boats tied to docks are at higher risk than boats kept at moorings or on anchors. Floating docks are rarely strong enough to take the loads exerted on them by boats in storm conditions. In addition, if the storm surge or tides are extremely high, floating docks may simply float off the pilings which hold them in place. A boat kept at a dock can’t weathercock (face into the wind) as storm winds change direction. Therefore, the boat at a dock almost always presents more windage than a boat secured to moorings or anchors that is free to swing head to wind.

The BoatUS Marine Insurance company wrote an excellent article on preparing boats for hurricanes. It discusses the various forces that can damage your boat during a hurricane. It then discusses the pros and cons of securing your boat ashore, at dock, in hurricane holes, on high-rise storage racks, on davits, on boat lifts, on trailers, at a mooring, at anchor or both. It provides step-by-step instruction on how to position your boat and arrange the lines for each of the possibilities. It also discusses other critical points that will help minimize the potential for damage during severe weather.

How to Prepare Your Boat Lift

We do not recommend securing your boat to the boat lift during a hurricane. A boat lift is not the ideal place to store your vessel during a hurricane, as the storm surge can rise higher than your lift. Furthermore, your boat has a lot of surface area relative to the piles and will greatly increase the wind force on the piles. Leaving the boat on the lift will increase the likelihood that hurricane-force winds will break the piles (or lift them out of the seabed) and cause your lift to collapse.

Therefore, the first step of preparing your boat lift for a hurricane is to remove the boat and store it someplace safe. Once the boat is removed, raise the cradle beams as high as you can and tie off the cradles to the piles. If you have an elevator-style lift, use extra lines to secure the cradle arms to help minimize the potential for them to sway in the wind. If you think the storm surge will swamp the lift, remove the boat lift motors, gearboxes, switches, covers & store in a dry safe place. Make sure you secure the cradles to structure BEFORE removing the gearbox as the cradles will fall without the gearbox holding the cables in place.

If you want to go the extra mile, you can reinforce your lift and piles using aluminum I-beams. Bracing your lift enables you to securely lock each corner of your lift’s cradle to its piling and creates one solid structure between the four pilings and the four corners of your lift. Your cables are one of the weak points of the lift, and the bracing will also support your cradles if the cables break. To accomplish this, you run an I-beam under each lift top beam and secure them to the slip side of the piles with U-bolts, aluminum backing plates, and locknuts. Then, the cradle beams will rest on and be secured to the I-beams. Our engineers can help you size the appropriate components and provide instructions for their installation. Or if you prefer an all in one kit, they are available from companies like Swing Stoppers.

What if you have no choice but to leave the boat on the lift?

If storing your boat somewhere else is not an option, knowing the amount of storm surge (the expected height of water above normal predicted tide) is the determining factor in how to best secure your boat to the lift during a hurricane.

If you are 100% confident that the storm surge will be below the raised height of the boat, you can take the following steps. Prepare the boat and lift as described above, leaving all lift equipment installed. The most crucial factor is to create a drainage system to prevent water from collecting in the hull and overloading the lift. It is not a good idea to rely on bilge pumps and batteries for draining the water since they can become overloaded (or fail) in a storm. Remove the boat drainage plug(s), so the water can drain out by gravity, lessen the strain on the bilge pumps and prevent the lift structure from overloading. If possible, slightly tilt (1-2 inches) the boat on the lift so that the rainwater will run out of the scuppers. This is easily accomplished on IMM Quality lifts using our wedge locks or adjustable height bunk brackets. Raise the boat as high as your lift allows and tie it as tightly as you can to the lift.

If the boat lift does not go high enough to be above storm surge levels or if you are not sure, you can try the following things. Prepare the boat and lift as described above, leaving all lift equipment installed. Slightly tilt (1-2 inches) the boat on the lift so that the rainwater will run out of the scuppers. Leave the boat drainage plug(s) in place. Pray that your bilge pumps don’t fail or become overloaded by the storm. Raise your boat as high as the lift allows but do not secure the boat to the lift. Secure long ropes to anchor points (do not secure to floating docks, use pilings) in case the surge lifts the boat off the lift. It is best to tie the lines high on the pilings, so they will not be chafed if a floating dock rides up on the pilings. Instead of using loose bowlines around the pilings, use multiple clove hitches, or a clove hitch finished with two half hitches. That way, the lines will tighten on the pilings, and are unlikely to pull off even if the pilings go under. If all goes well, these steps may help keep your boat somewhat close to your boat lift.

After the Storm

There is no way any one blog post can cover all of the contingencies (for example, we have completely ignored insurance concerns), but we hope this article puts you on the right path. If you follow these tips and think about how they apply to your situation, you will be well prepared for hurricane season and can rest easier knowing your home and boat are as safe as possible. For more information on what to do once the weather clears up, please read our post “After a Storm: Inspecting Your Boat Lift and Dock”.

Get High Quality Boat Lifts Today!

At IMM Quality Boat Lifts, we are committed to building the best quality boat lifts on the market today. Our lifts are built to last a lifetime.

But more than that, we want you to enjoy being out on the water in your boat. We don’t want you wasting your time on maintenance, repairs, or even where to find the best boat shoes. Keep visiting our blog to learn all about the boating lifestyle and Boat Lifts.

Frequently Asked Questions (FAQs) for Preparing your Boat and Dock for Hurricane Season

Hurricane season spans from June 1st to November 30th, critically affecting those on the Eastern seaboard and Gulf of Mexico. Preparation is key to protecting boats and docks.

Inspect your seawall at low tide for signs of cracking, shifting, or erosion, and consult a professional if you notice these indicators.

Beyond securing your property, assembling a disaster supplies kit and having a plan tailored to your family's specific needs are vital steps.

Secure essential documents, turn off the electrical system, remove detachable items, and lash down immovable parts. Consider storage options based on storm surge expectations.

Remove the boat from the lift, secure cradle beams, consider removing lift motors if a surge is expected, and brace the lift if possible.

Installing a Boat Lift Cable

blog install boat lift
Boat lift cables are important components in a boat lift. They can encounter catastrophic failure when you do not install them correctly or when you do not maintain them well. With the different sizes, models, and brands of boat lifts on the market, it is appropriate to consult a professional and licensed boat lift technician before you buy or install a new boat lift cable.
If your boat lift needs new cables, you might be curious about how to properly install them or how the boatlift technicians will do it for you.
This article defines a boat lift cable, introduces the types of boat lift cables, guides you on the right installation procedure, and lists important tips for maintenance.
blog install boat lift1

What is a Boat Lift Cable?

Boat lift cables, also called hoist wires or cables, connect the lifting mechanism to the cradles that pick up the boat. They allow the boat or watercraft to be lowered and raised whenever you need them.
The lift cables will always wear down with time and will need to be replaced.  It does not matter what type of lift cable you choose as they will wear out with time. The duration before you replace the cables will depend on the type of cable, the type of lift, performance of proper maintenance and how often you use the lift. Replacing worn lift cables is a necessary part of owning a boat lift, like changing the tires on your car.

Types of Boat Lift Cables

There are many types of boat lift cables. Some are made from galvanized steel cable while most boat lifts use 300 series stainless steel cable. Lift cables also differ in their construction and can vary in diameter as well as the number and orientation of strands used in their construction.

Galvanized Cable

Galvanized cable is more flexible and softer when compared to stainless steel cable. This makes galvanized cable more resilient to work hardening (the process where metal will break after it is repeatedly bent) and to abrasion damage. The major problem with galvanized cable is that the galvanized coating does not provide adequate protection against cable corrosion. This means you should not use the galvanized cable in salt water or submerge it for long periods in freshwater.
Although the galvanized cable has problems with rust, it is more affordable than stainless steel cable. This makes it an excellent option for freshwater boat lifts.

Stainless Steel Cable

When compared to galvanized cables of similar size, stainless steel cables can not lift as much weight. This results in stainless steel cables costing more than galvanized cables with the same weight rating. A stainless steel cable is an excellent option for saltwater boat lifts since it has better corrosion resistance than galvanized steel. The problem with stainless steel is that it is more prone to work hardening and abrasion damage. There are different grades of stainless steel cable. 304 stainless is more flexible and wear resistant than 316 stainless which has the highest corrosion resistance. It is a good idea to regularly check stainless steel cables for broken strands by gently feeling along the length of the cable while exercising lots of care to avoid cutting yourself.

Cable Construction

Boat lift cables also differ in their construction. Cables with larger diameters will be able to carry more weight. Typical boat lift cables come in 5/16″ and ⅜” diameters. Cables can be made with different strand configurations. Two common configurations used with boat lift cables are 7 x 19 and 6 x 36 construction. For a given diameter, the 6 x 36 construction will have thinner strands which will result in a more flexible cable.
blog install boat lift2

How to Install Boat Lift Cables

The boat lift cable installation process relies heavily on the type of boat lift you own. We highly recommend having a professional marine contractor install the replacement cables. They have the experience and access to specialized equipment that make the job safer and easier. For your knowledge and to assist the marine contractor please
  • Identify the type of boat lift at your home, then obtain the owner’s manual, installation manual and product specification sheet from the manufacturer. If you own an IMM Quality Boat Lift, please call (800) 545-5603 and ask to speak with technical support if you have any questions.
  • Please read the pertinent information from these documents and make sure that you fully understand the steps.
If you choose to perform the work yourself, here is a step-by-step guide on how to install a replacement boat lift cable.
    1. Obtain the correct size and length of replacement cables for your specific boat lift from the manufacturer.
Image A. The IMM Quality Boat Lift’s replacement cable comes with a fused end and a copper stop on the other end.
    1. Remove the boat / watercraft from the boat lift.
    2. Secure the cradle beams. We recommend using nylon strapping to tie the cradle beams to the top beam channel. Some marine contractors will use chain or other strapping, while others will use their barge to support the cradle beams and bunks.
Image B. During a cable replacement, the cradle beams were held above the water using chains.
    1. With the cradle beams secure, cut and remove the worn lift cables.
    2. When installing the new cable, it is easiest to start at the cable winder. The IMM Quality Boat Lift cable winder is drilled with two holes, one larger and one smaller, in line with each other. Insert the fused end of the cable into the larger hole and then through the smaller hole. Continue to pull the fused end of the cable through the winder until the copper stop bottoms out on the smaller hole.
Image C. Looking down at the IMM Quality Boat Lifts cable winder to show the two in-line holes with the larger hole towards the top (closest to viewer) of the winder.
    1. Route the cable according to the cable routing diagram provided by your manufacturer.
Image D. The cable routing diagram for an IMM Quality 10,000 pound beamless boat lift.
    1. Repeat steps 4-6 for the remaining cables. On a typical 4 post lift, each lift will have four sets of cable, two for each top beam, one for each winder. Elevator lifts only have two sets of cables, one for each powerhead.
    2. When all of the new cable has been installed, you may remove the support strapping. Allow the cradles to drop gently into the water and come to a rest on the sea bed.
    3. Raise the lift, watching to make sure that the new cable is winding properly on all of the winders. Continue to raise the lift until the cradles are out of the water.
    4. IMM Quality Boat Lifts use the patented wedge lock. The wedge lock allows you to easily adjust the cable length. Our competitors’ cables terminate with copper stops or loops attached to shackles which do not allow adjustment.
Image E. Adjusting cable length is easy with the wedge lock, whereas our competitors use non-adjustable cable terminations
  1. Use the wedge lock to adjust the cable length so that the cradle beams and bunks are level. Simply loosen the internal wedge to feed cable through in either direction. When the cradles are level, pull down on the cables to lock the wedge, securing the cable.
  2. Run the lift up and down a few times. Watch and listen carefully. You want to make sure that everything is working properly with the boat lift. Do not load a boat onto the lift until you are satisfied that everything is working properly.
Congratulations! You are all finished. You may lower the lift and put the boat back on.

Necessary Precautions to Take When Installing New Boat Lift Cable

  • Ensure you work in a safe manner at all times
  • Ensure you only use the right equipment and tools
  • Follow only the relevant instructions and drawings
  • Please review the installation to ensure it is complete and well done

Common Problems During the Installation of a Boat Lift Cable

If you install the lift cables improperly or hastily, you will likely encounter many problems with the boat lift. Make it a habit of inspecting everything when you are done with the installation. In most cases, un-smooth movements or unusual sounds will be a red flag that will enable you to detect a problem that needs to be corrected. The most common problem experienced during installation is that the cables are not wrapping properly on the winder. The cables should wind neatly and tightly within the grooves of the winder. If you notice any backlash (tangle) with the cable, do not try to remove it with your hands. Trying to fix backlash with your hands puts you at serious risk for injury. Simply lower the cradles, until the backlashed cable is off the winder, then slowly raise the cradles making sure the cable is winding properly.
Image F. Save your fingers! Do not try to fix backlash by pulling on the cable with your hands.
If you don’t have an IMM Quality boat lift, the most difficult part of cable installation is getting the cradles and bunks level. Most boat lift manufacturers use cables that terminate with a loop. This loop connects with a shackle, which does not allow adjustment of the cable length, making leveling your cradles very difficult.
Image G. Replacement cable with loop end. As shown on the right, the loop is attached to a “D” shackle on the boat lift.
To level the cradles on our competitor’s lifts, you need to adjust the cable length at the winder. First, you need to run the lift all the way down, so that all the cable is off the winder. Some lifts use copper stops to secure the cable to the winder and others use wire rope clips. To shorten the cable length you have to: 1. Cut of the copper stop, pull the required length of cable through the hole in the winder, put a new copper stop at the right location and crimp it securely in place, or 2. Loosen the wire rope clip, pull the required length of cable through the hole in the winder, tighten the wire rope clip to hold the cable in the new position. 
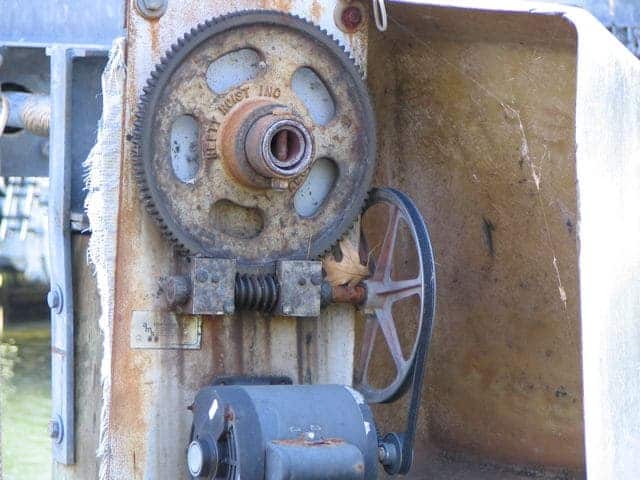
As you can clearly see, the patented IMM Quality Boat Lifts wedge lock makes adjusting cable length to level the cradles much easier.

Maintenance Practices after Installation of New Boat Lift Cable

After you are finished with the new cable installation, you need to make sure that you maintain them. Proper maintenance of the new boat lift cable will ensure it functions well and will prolong its lifespan.
The most important thing to do is to routinely inspect the cables for signs of damage or wear. You do not want to see any signs of rust, kinks, broken strands or any other irregularities. To help protect the strands of the cable, you can use a penetrating chain and cable spray lubricant. This will protect the internal strands from abrasion wear as well as the outer strands from corrosion.
You should also make sure that any pulleys are turning freely. Cables sawing against seized pulleys will cause great damage that may result in a catastrophic break. Frequently rinsing your lifts moving parts with fresh water to remove salt deposits will help prevent the pulleys from seizing. IMM Quality Boat Lifts uses self-lubricating bushings so no maintenance lubrication is needed with our pulleys. However, most manufacturers use pulleys that require lubrication with grease.
Even if there are no signs of wear and tear, we recommend replacing the lift cables every two years or after 200 up and down cycles, whichever comes first.

Conclusion

We hope you found this guide helpful and informative. By showing you the steps needed to install new lift cables, we hope that you will make your boat lift’s maintenance a priority.

We also hope that we have convinced you that maintaining an IMM Quality boat lift is much easier than with the competition. Our lifts were engineered to make the user experience as easy and enjoyable as possible. By only using the best possible materials, we will save you time and money by reducing the amount of maintenance you need to perform on your lift. That way you will be able to get back out on the water and enjoy yourself.

If you have any questions or need any advice about your boat lift maintenance, please don’t hesitate to call us at (800) 545-5603. Also, if you need any parts for your maintenance, our sales team will make sure that you get what you need. IMM Quality Boat Lifts. Built for a Lifetime!

Happy Boating!

Frequently Asked Questions (FAQs) about Installing a Boat Lift Cable:

A boat lift cable is a wire or cable that connects the lifting mechanism to the cradles, allowing the boat to be raised or lowered as needed.

Boat lift cables can be made from galvanized steel or stainless steel, with different constructions like 7x19 or 6x36, affecting their flexibility and strength.

The installation process varies depending on the type of boat lift, but it generally involves securing the cradle beams, removing old cables, and routing new cables according to the manufacturer's diagram.

Safety is paramount, so use the right equipment, follow instructions carefully, and ensure the installation is complete and secure.

Regularly inspect the cables for damage or wear, lubricate them to protect against corrosion and abrasion, and replace them every two years or after 200 cycles.

The Ultimate Guide to Boat Lift Maintenance

When washing down your boat after a day on the water, don't forget to also wash the salt and sea spray from your boat lift top beams and cradles.

The Dock and Boat Lift Inspection

The Pile and Seawall Inspection

Start by examining your pilings, dock structure, and/or seawall. Your boat lift is only as strong as the foundation that supports it. If your pilings or dock structure show signs of damage, you should repair them before the weight of your boat and lift cause a catastrophic failure.

damaged pile and seawall
Figure 1: Damaged pile and seawall

Top Beams Inspection

Next, examine the structure of your top beams. If your boat lifts top beams were made from galvanized steel, you should carefully look for rust. Unfortunately, the galvanized coating comes off easily and the steel will begin to rust. Galvanized steel can rust completely through the metal compromising the structural integrity of your boat lift. At the first signs of rust, you should clean it off and apply a protective coating to the steel.

Unlike steel, aluminum only surface oxidizes. The surface layer of aluminum oxide forms a protective coating preventing further oxidation of internal aluminum molecules, which allows aluminum beams to maintain their structural strength. Because aluminum does not rust through and only surface oxidizes, most modern boat lifts use aluminum for their structural beams. Although you may not like the patina look of oxidized aluminum, you can rest assured that your aluminum beams are structurally sound and protected from internal rusting.

The aluminum pipe was dipped into an oxidizing agent to demonstrate the difference between "clean" and oxidized aluminum.
Figure 2. The aluminum pipe was dipped into an oxidizing agent to demonstrate the difference between “clean” and oxidized aluminum.

Next, you need to examine your lift’s top beam structure for galvanic corrosion.

It is fairly common to see signs of galvanic corrosion where stainless steel hardware touches the aluminum top beams. The amount of corrosion shown in image 3 is primarily cosmetic and not much to be concerned about. However, image 4 shows a case where the corrosion has damaged the aluminum winder nearly to the point of failure.

signs of galvanic corrosion
Image 3 is primarily cosmetic and not much to be concerned about. Image 4 shows a case where the corrosion has damaged the aluminum winder nearly to the point of failure.

In both cases, occasionally rinsing the boat lift with fresh water will help minimize galvanic corrosion.

Oxidative corrosion and galvanic corrosion look very similar, but the mechanism for galvanic corrosion is very different. A simple explanation is that salt has electrolytes that dissolve in water. These electrolytes are attracted to any electrons that are found nearby. Every type of metal has electrons. Yet some metal is more chemically active and has a greater negative electromechanical potential than others. Metals like platinum, titanium, stainless steel, and silver are less chemically active and therefore act as cathodes (positive). Metals which are more chemically active function as anodes (negative). These metals include zinc, magnesium, and aluminum alloys.

When two dissimilar metals enter an electrolyte solution, in this case saltwater, the electrolytes connect to each metal, and create a current flow from the anode-type metal to the cathode-type metal. This electrochemical process is much like a battery where you have a positive side and a negative side with the saltwater creating a conducive path for the current. The electrolytes pull out the electrons from the anode metal while flowing toward the cathode metal, as the anode metal begins to corrode away. This process is called galvanic corrosion. To make matters worse, there is another similar type of corrosion, electrolytic corrosion. With electrolytic corrosion, an electric current has been introduced into the electrolyte solution. When an electric current is added into saltwater, it speeds up the rate of corrosion because the electric current quickly flows from the anode metal to the cathode metal speeding up the rate at which the anode metal’s electrons are removed. The electrical source can be as simple as faulty wiring (from a boat battery, dock light, boat lift, etc.) discharging its electric current into the water.

Powerheads Inspection

One of the most important things to inspect are your powerheads. Make sure that your gearbox and motors have not been damaged in a collision, or by the environment.

Rusty Boat Lift Motor and Uncovered Gearing

One of the best ways to protect your powerheads is to keep them under a cover (See the post “Benefits of a Covered Drive” to learn how our covers protect your powerheads from more than just the elements.). That is why IMM Quality Boat Lifts covers all our powerheads.

The Alumavator, Platinum and Superlift covers

Rusty Cradle beams and brackets and Worn carpet on bunks

Cradles and Bunks Inspection

Moving down the boat lift structure, carefully inspect the boat lift cradles and bunks. Look for signs of corrosion on the support beams as well as the brackets that support guide posts or bunks. If you have carpeted wood bunks, examine the carpet for signs of wear.

Lift Cables Inspection

Lastly, inspect your lift’s cables. Ultimately, the cables support the entire weight of your boat. Carefully inspect the cables for signs of damage and wear. We recommend replacing your cables every two years or 200 up and down “cycles”, whichever comes first.

Immediately replace the cables if you notice any of these types of cable damage.
Image 10: Immediately replace the cables if you notice any of these types of cable damage.

One of the best ways to protect your cables and extend their usable life is to own a boat lift that uses grooved aluminum cable winders. Aluminum is softer than the steel of the cables, which will help minimize metal-on-metal abrasion to the cables. The grooved winders also neatly wind the cable, preventing cable on cable wraps and helping to prevent the types of damage shown in Image 10.

Grooved aluminum winder with cable pre-wrapped at factory for simple installation.
Image 11: Grooved aluminum winder with cable pre-wrapped at factory for simple installation.

If you determine that the lift’s cables need to be replaced, please visit this post “Installing a new boat lift cable” for helpful advice on the process.

Special Considerations for Elevator Lifts

Elevator lifts have additional maintenance concerns. They have permanently installed tracks in the water that the carriage rides on. Because these tracks are always in the seawater, they are especially susceptible to corrosion.

New elevator lift showing how tracks are permanently installed underwater
Image 12: New elevator lift showing how tracks are permanently installed underwater

To minimize your risk of corrosion, we recommend installing sacrificial Zinc anodes to the elevator tracks. Zinc is chemically more active than aluminum, therefore the zinc anode will corrode away before galvanic corrosion begins attacking the aluminum tracks. Frequently check, and replace worn zinc anodes to minimize the effects of galvanic corrosion on the tracks.

minimize your risk of corrosion

Failure to maintain the sacrificial zinc anodes may result in significant galvanic corrosion. The following image shows an elevator track, carriage arm and support brackets that suffered severe galvanic corrosion that could have been minimized by maintaining the sacrificial zinc anodes.

galvanic corrosion

Lubricate Lubricate Lubricate!

To keep your boat lift working properly, you must make sure that all the moving parts are properly lubricated. Lubricate the powerheads. Consult your owner’s manual to determine what parts of your boat lift’s powerhead require lubrication. Our Alumavator and Superlift powerheads have sprockets and chains that require lubrication every six months.

The Alumavator and Superlift sprockets and chain require lubrication.
Image 15: The Alumavator and Superlift sprockets and chain require lubrication.

If you are willing to take the cover off, we recommend wiping on a thin layer of marine grade grease over the entire sprocket and chain. However, we have made an easier solution that does not require the removal of the cover. On the back side of the powerhead plate, we have made an access port to lubricate the chain and sprocket. While running the lift down, take the red plug out of the hole and apply chain and cable spray lubricant onto the chain.

 It's easy to use spray chain lube with our access port.
Image 16. It’s easy to use spray chain lube with our access port.

Our Platinum lifts were designed to be low maintenance. The Platinum powerheads use a double reduction direct drive gearbox. The gearboxes were filled with lubricant and sealed at the factory. Therefore, no lubrication is necessary during routine maintenance.

The no-maintenance Platinum powerheads do not require lubrication.
Image 17: The no-maintenance Platinum powerheads do not require lubrication.

Lubricate the drive pipe bearings

One of the most important, and time-consuming, components of a boat lift to lubricate are the drive pipe bearings. Typically, these bearings have zerk grease fittings for a grease gun to lubricate the bearing. Most boat lifts have 4-5 drive pipe bearings per top beam that require lubrication, but you also need to check your powerheads because they sometimes have zerk fittings for lubrication.

Drive pipe bearings with zerk grease fittings. Notice how the "flat plate drive" powerhead contains a drive pipe bearing block that requires lubrication using a zerk grease fitting.
Image 18. Drive pipe bearings with zerk grease fittings. Notice how the “flat plate drive” powerhead contains a drive pipe bearing block that requires lubrication using a zerk grease fitting.

Zerk Grease Fittings

To fill the bearings with grease, attach the grease gun hose to the zerk fitting and pump in grease until you see some squeeze out between the drive shaft and bearing. Repeat this process for each drive pipe bearing.
drive pipe bearings2
drive pipe bearings

In order to ensure good grease distribution, you should rotate the drive pipe and pump in more grease at each bearing. You should repeat the rotation and greasing process two more times and then move on to the second top beam.

The manufacturers recommend lubricating these bearings at least once every six months. Rain can wash away some grease, but the biggest problem is that the heat and the sun rays degrade the grease and cause it to solidify. Solidified grease is very difficult to remove and it can block the zerk fittings, making it very difficult to lubricate your lift.

This drive pipe bearing was not lubricated frequently enough. The grease hardened and the drive pipe has seized within the bearing.
Image 19. This drive pipe bearing was not lubricated frequently enough. The grease hardened and the drive pipe has seized within the bearing.

IMM Quality Boat Lifts Solution

What if you don’t like all that grease squeezing out of the bearings and dripping on to your boat, the dock and into the water? What a mess! What if you don’t feel like lubricating your drive pipe bearings every six months?

IMM Quality Boat Lifts understands completely. That is why we use self-lubricating tribopolymer bushings in all of our drive pipe bearings. This space age material was developed by NASA for the shuttle program because grease bearings make no sense in outer space. Our drive pipe bearings have no zerk fittings, no need for grease and no need for any other maintenance. By using this revolutionary material in all of our models we help save you time and money by reducing maintenance costs.

A self-lubricating Tribopolymer bushing is shown on the top beam channel. This bushing presses into the drive pipe bearing and prevents abrasion wear between the drive pipe and bearing block. This maintenance-free component is only available on IMM Quality boat lifts.
Image 20: A self-lubricating Tribopolymer bushing is shown on the top beam channel. This bushing presses into the drive pipe bearing and prevents abrasion wear between the drive pipe and bearing block. This maintenance-free component is only available on IMM Quality boat lifts.

Lubricate the Pulleys / Sheaves

Another time-consuming task is the lubrication of the boat lift’s sheaves/pulleys. Typically, the pulley bearing has a zerk grease fitting to lubricate between the shaft and pulley. The number of pulleys will depend on how many parts the cable system contains (cable drops straight down (1 part), the cable comes down goes around a pulley, and then back up (2 parts), etc.) The pulleys may be located on the cradles or the top beams. All the pulleys will require lubrication at a minimum of every six months.

lubricate the pulleys
Image 21. New slide on pulley with zerk fitting on left, seized pulley on right.

The pulley on the right in image 21 was not properly lubricated and has seized so that it no longer turns. Now when you lower or raise the lift, the cables saw into the metal of the pulley and will cause tremendous abrasion damage to the cables. If this pulley is not replaced quickly, the cables will snap.

Even if your pulleys have not seized, forgetting to lubricate them will cause abrasion wear. Image 22 shows pulley axles worn away and the damage that a lack of lubrication may cause to your pulleys.

The left image shows a new axle bolt, a worn axle bolt and an axle bolt that has cracked due to improper lubrication. The image on the right demonstrates how the axle bolt can grind through the pulley bearing when not properly lubricated.
Image 22. The left image shows a new axle bolt, a worn axle bolt and an axle bolt that has cracked due to improper lubrication. The image on the right demonstrates how the axle bolt can grind through the pulley bearing when not properly lubricated.

What if you don’t have time to lubricate your sheaves/pulleys every six months? What if you forget?

We are all busy, trust us, we get it. That is why we use self-lubricating tribopolymer bushings in all of our sheaves/pulleys. Just like our drive pipe bearings, our pulleys do not require lubrication and never need any maintenance. By using the best materials available in the pulleys in all of our models we help save you time and money by reducing maintenance costs.

self lubricating tribopolymer
Image 23. Our pulley and a self-lubricating tribopolymer bushing. The bushing presses into the pulley and protects the pulley and axle bolt from abrasion wear. These bushings do not require lubrication or any ongoing maintenance.

Conclusion

Owning a boat lift makes cleaning and maintaining your boat a much easier task, but don’t neglect to maintain your boat lift as well.

When washing down your boat after a day on the water, don't forget to also wash the salt and sea spray from your boat lift top beams and cradles.
Image 24. When washing down your boat after a day on the water, don’t forget to also wash the salt and sea spray from your boat lift top beams and cradles.

We hope you found this guide helpful and edifying. By showing you some of the things that can go wrong if you neglect to perform routine maintenance, we hope that you will make your boat lift’s maintenance a priority.

We also hope that we have convinced you that maintaining an IMM Quality boat lift is much easier than with the competition. Our lifts were engineered to make the user experience as easy and enjoyable as possible. By only using the best possible materials, we will save you time and money by reducing the amount of maintenance you need to perform on your lift. That way you will be able to get back out on the water and enjoy yourself.

If you have any questions or need any advice about your boat lift maintenance, please don’t hesitate to call us at (800) 545-5603. Also, if you need any parts for your maintenance, our sales team will make sure that you get what you need.
Happy Boating!

Frequently Asked Questions (FAQs) about Ultimate Guide to Boat Lift Maintenance

It's crucial to check for signs of rust or corrosion to maintain structural integrity and ensure safety.

Inspect cables regularly for damage and wear, and replace them every two years or after 200 cycles to ensure safety.

Keeping powerheads under a cover helps protect them from environmental damage and prolongs their lifespan.

Due to their constant submersion, it's recommended to install sacrificial zinc anodes on elevator tracks to minimize corrosion.

Lubrication of sprockets, chains, drive pipe bearings, and pulleys is essential for smooth operation and should be done at least every six months.

How to Keep Salt Water and Fresh Water from Damaging Boats

Large navy and white boat sits on Thaler 2 Superlift vertical boat lift helps this boat avoid salt water damage and fresh water damage

Boats are engineered for use in the water. However, prolonged exposure to salt water and fresh water can damage boats. In fact, water exposure can actually shorten the lifespan of a boat. Given that boats are such a substantial investment, it’s important to keep vessels in tip-top shape. 

Most boats and yachts on the market today feature hulls made of fiberglass or aluminum. Although fiberglass and aluminum boats are durable, easy to maintain and long-lasting, they are not invincible. Salt water is especially harsh on many materials, but even fresh water can damage boats, too. That’s why it is important to not store boats directly in the water for long periods. 

Below are several ways that salt water and fresh water can damage boats: 

  • Corrosion: Nearly all metals, wiring and electrical hardware can rust with prolonged water exposure. 
  • Undergrowth: Mold, algae and even barnacles can grow on stationary boats. 
  • Osmotic blisters: This type of scarring forms when water permeates the surface material. 
  • Discoloration: Water can stain vessels and leave unsightly color lines or marks. 
  • Heavy wake: Waves from passing boats can send water gushing onto and into motors. 

Salt water can corrode metals five to 10 times faster than fresh water. 

Storing boats in the water requires near-constant maintenance. Boat owners often pay divers to clean barnacles, algae and other biological organisms from the hull. However, that cleaning process can be damaging. After being cleaned, boats often need a new gel coat application or other repairs to the hull, which can be costly. 

Discover Boating outlines four boat storage options in an article titled “Boat storage: Which method is best for you?” What option wasn’t on the list? Storing the boat directly in the water. Grady-White, a leading boat manufacturer, even reposted the article on its website. 

How can you avoid damage from salt water or fresh water? One effective strategy stands out as the clear-cut choice – install a boat lift. 

Avoid Salt Water Damage and Fresh Water Damage with a Boat Lift 

Boat lifts avoid the aforementioned problems with storing boats directly in water by lifting vessels above the surface. Boat lifts come in all shapes and sizes, accommodating everything from kayaks and skiffs to catamarans and yachts. 

IMM Quality Boat lifts designs, manufacturers and engineers custom boat lifts for salt water and fresh water environments. Using 3D modeling and structural analysis software, manufacturing is completed on fully computerized machines to guarantee precision and quality. 

Boat lifts are popular choices for three reasons: 

(1) Boat protection: Storing boats on lifts protects them against corrosion, undergrowth, osmotic blisters, discoloration and heavy wake. Boat lifts can hoist boats from a few inches above the water’s surface to five feet or more above the water line. 

(2) Convenience: Boat owners can store their boats at a marina or dry storage facility, but both require a drive from home. Boat owners who live on the water or in boating communities can store their boat on site, offering unparalleled convenience. Boat owners can be on the water in just minutes. 

(3) Cost: Off-site storage facilities and marinas often require a deposit and hefty monthly fees. After an initial investment, boat lifts have low maintenance costs and often pay for themselves within a few years. 

After returning from a day on the water, especially salt water, it’s important to clean your boat. That includes rinsing all portions of the boat’s exterior and interior, as well as rinsing the engine and cooling systems. This helps prevent rust from forming. 

Always consult with the boat manufacturer to determine preventative maintenance requirements. 

READ MORE10 reasons to buy a boat lift 

Want to maximize the life of your boat with a boat lift? Complete ourCONTACT FORM or REQUEST A QUOTE and our responsive, knowledgeable team will give you a call!

The True Cost of Boat Ownership: What You Need to Know

Two leaning boats in marina show the hidden cost of boat ownership after a storm

The true cost of boat ownership entails far more than just purchasing a watercraft and sailing into the sunset. Many hidden costs come with boat ownership, including maintenance, repairs and boat storage fees. As a result, the true cost of owning a boat often feels like an unpleasant surprise to many first-time boat buyers.

Some boating expenses are universal, no matter which boat you decide to purchase. These include your license, boaters insurance, boat registration, taxes, and any equipment or accessories. Other costs like fuel will depend on the size and style of your craft, but remain fairly consistent over the lifetime of your boat. And then, there’s the question of boat storage.

Racking Up the Storage Costs of Boat Ownership 

You will need somewhere to store your brand-new toy. If it is small enough to fit onto a boat trailer, it may be possible to store on your property. The price will depend on the size, make and type of your ideal boat trailer. Typically, the price tag ranges from $600 to more than $8,000. That estimate does not include any additional special features, such as a trailer hitch, spare tire, sideview mirror, breakaway system or towing incidentals.

Additionally, don’t forget to consider the time, hassle and risk involved with transportation to a public boat launch. An accident while towing on the road could damage your trailer – or worse, its precious cargo. Or, if your boat will dock at your residential home, consider the toll on your knees from tying up to your pier.

Many larger boats cannot be accommodated by a small boat trailer. If this is the case, you will have to shell out for a dock slip or harbor space. These can range from around $3,000 per year for a small watercraft to more than $15,000 for large yachts. However, maintenance associated with keeping your boat in the water can quickly spiral beyond expectations. Depending on water conditions, your boat may develop hull blisters, salt corrosion or algae growth. Repairs may require expensive bottom cleaning, painting and more.

Avoid the Hidden Costs of Boat Ownership with IMM Quality Boat Lifts 

That’s why marine professionals recommend building and using a boat lift to protect your investment. Sure, boat lifts make it easy to launch your boat. But high-quality, expertly engineered boats lifts can also save you substantial time, money and hassle.

Using a boat lift can extend the life of your watercraft by keeping it elevated above the water line. Not only does this safeguard your boat from seasonal elements, but it also controls maintenance costs. This will positively impact the resale value of your boat in the future.

Boat lifts offer fewer opportunities for damage during transportation while allowing you to store your boat year-round. After all, wouldn’t it be nice to be on the water in minutes, with nothing more than the press of a button? Your time is too valuable to be wasted sitting in traffic. And, you can choose from a wide variety of boat lift styles as well as custom-built boat lifts for the perfect fit.

Convinced and ready to explore your boat lift options? IMM Quality’s boat lifts are long-lasting, dependable and aesthetically pleasing. Located in Southwest Florida, IMM Quality Boat Lifts is the world’s leading manufacturer of aluminum boat lifts. Manufactured at our state-of-the-art Fort Myers facilities, IMM Quality Boat Lifts’ product lines include personal watercraft (PWC) liftselevator boat liftsboathouse liftsvertical boatliftsspecialty boatliftsTitan yacht boat lifts models and more.

If you would like to invest in the highest quality boat lift on the market, call IMM Quality Boat Lifts. Let our 40+ years of boat lift design and engineering experience help you design the perfect lift for your boat. Each boat lift comes complete with an industry-leading warranty.

Learn More About IMM Quality Boat Lifts

Feeling inspired by this feat of design, engineering and manufacturing? Complete ourCONTACT FORM or REQUEST A QUOTE and our responsive, knowledgeable team will give you a call!

READ MORE:Boat Lift Capacity: Myths Vs. Facts

Weathering the storm: Preparing boat lifts for hurricanes, storm surge

Make Sure Your Boat is Stored Properly

Weather changes quickly, and boat lifts are subject to the wrath of hurricanes and tropical storms.

However, a well-engineered, custom boat lift can withstand much of nature’s fury.

IMM Quality Boat Lifts designs, engineers and manufactures custom boat lifts for all climates – tropical, subtropical, temperate and continental. Across the world, no matter the climate, people love to spend time on the water.

Boat owners should be aware of the impacts of hurricanes and tropical storms, as well as storm surge, on their boat lifts.

High Winds

Hurricanes and tropical storms pack powerful winds, storm surge flooding and torrential rains. These weather systems pose a trifecta of concerns for boat owners in coastal regions.

Powerful winds damage structures of all types, even reinforced concrete block buildings. IMM Quality Boat Lifts recommends two safe options for boat storage during a storm: (1) Move a boat out of a storm’s projected path, or (2) Move the boat onto dry land, either in a secure, indoor storage facility or up on keel blocks with boat jacks and strapped to the ground using helical anchors. Although IMM Quality Boat Lifts builds its lifts with thick aluminum beams and stainless steel, a lift is only as strong as the supporting structure (the wood piles and dock).  To minimize the risk for potential damage, we Do Not recommend keeping your boat on a lift.

During a storm, waves can smash boats repeatedly against a dock or pilings.  High winds will cause boats secured on a four-post cradle lift to swing violently from front to back, or side to side.  Meanwhile, boats secured on elevator lifts often fare no better, with their carriages bouncing from the wind gusts.  Ultimately, the boat lift may fail with snapped cables being the most common cause.

If left with no option, many boat owners have prepared cradle lifts by completing the following steps:

  • With the boat in place, attach lines between cleats on the boat and dock.
  • Raise the cradle beams to their maximum height so lines become taut. Lines that are too loose can allow boats to float away; lines that are too taut create pressure that can crush a boat.
  • Boat owners with mechanical and electrical know-how can remove the boat lift’s motor and gear box, and store them in a dry place.
  • To minimize the amount of cradle swing, strap each of the four corners of the lift cradle to the closest pile.
  • To prevent the boat from dropping after lift cables snap, brace the cradle with aluminum I-beams beneath the cradle beams, and secure the I-beams to the piles.

Boat owners with elevator lifts have done the following:

  • With the boat in place, attach lines between cleats on the boat and dock.
  • Raise the elevator carriage to its maximum height so the lines become taut to prevent wind gusts from blowing the boat off the bunks.
  • Secure box clamps around the I-beam tracks, just below the upper wheels of the carriage. This makes sure a boat cannot slide down to the water if the lift cables snap.
  • As an alternative to box clamps, mechanically minded individuals can drill a hole through the I-beam track just below the upper wheels of the carriage. Bolt a 4 x 4 block of wood through this hole to prevent the carriage from sliding down to the water if the cables snap.
  • Boat owners with mechanical and electrical know-how can remove the boat lift’s motor and gear box, and store them in a dry place.
  • Place straps around the dock and elevator carriage to stop any potential swinging or bouncing.

With both types of lifts, turn off power to the dock and boat lift. Power outages are common during hurricanes, and when it’s restored, live wires damaged in the storm can present safety hazards.

Storm Surge and Heavy Rain

Water is another concern during hurricanes and tropical storms.

Rising water from tropical systems, called storm surge, affects both coastal and inland waterways. Larger storms can cause water levels to rise 5 or 10 feet, or higher. Engineers design most boat lifts to keep vessels safely elevated a few feet above the high tide water level. Storm surge can easily surpass the high tide water level, lifting a boat up and off its bunks, even if it appears to be fairly secured. Again, this is why IMM Quality Boat Lifts recommends dry storage if possible.

Torrential rains pose a different issue. Hurricanes and tropical storms can produce rainfall rates as high as 6 inches per hour. One gallon of water weighs 8.34 pounds, so imagine how much water an uncovered boat can collect during a heavy rainstorm. Prior to a storm, make sure scuppers are free of debris and drain plugs are open. Tilting the boat lift bunks slightly ensures that water will drain toward the plug. Check that the bilge pumps are functional and that their batteries have a good charge. Added weight from storm water can cause the boat to exceed the lifts’ capacity and may result in catastrophic failure of the lift.

READ MORE: Boat lift capacity: Myths vs. facts

Are you looking for an engineering expert to design a custom boat lift that matches weather conditions in your environment? Complete our CONTACT FORM or REQUEST A QUOTE and we’ll give you a call!

Boat Lift and Dock Winterization

Boat Lift and Dock Winterization for long dock on frozen lake

Winter is coming. It is all too easy to believe that there is no need for ongoing care during the winter months, but it is important to realize that without proper preventative care, ice can wreak havoc with your dock and boat lift, which may result in thousands of dollars in damage. As the ice expands and contracts, the pressure can cause your dock to become misshapen or damaged. Strong winds, tides and seiches can also cause ice floes into your dock, damaging pilings and dock structure. If snow builds up on top of your boat, the extra weight may cause your boat lift to fail if it isn’t removed promptly.

What Happens When Your Boat Lift Or Dock Is Not Ready For Winter

How To Protect Your Dock

The goal is to prevent ice from forming around your permanent dock. There are two main methods, bubblers and deicers. A dock bubbler uses self-weighted air hoses connected to an air compressor on shore. The low pressure, high volume air releases thousands of bubbles through holes in the hose which agitate the water and brings warmer water to the surface. This keeps the area free of ice and works best when the water depth is 6 feet or less. Dock deicers are a submersible unit with a built-in impeller and motor that is installed below the dock. The deicer’s propellers create an artificial current that draws up warmer subsurface water to the surface. Creating a continuous flow of warmer water to the surface prevents ice from forming. Although these methods are not full-proof, they are good enough to protect your dock during most winters.

How To Protect Your Dock during winter

How To Protect Your Boat Lift

The first thing to do when winterizing your boat lift is to perform a thorough inspection. Pay special attention to your cables and replace them if there is any sign of fraying. Spraying the cables with a penetrating lubricant may protect them from ice. If your lift has a chain or bearings that require lubrication, make sure that they are sufficiently lubricated. It is best to store your boat on-shore during winter. If this is not possible, make sure to raise your lift as high as possible and secure the cradles to the top beams and other dock structure using strapping. This will prevent your boat from rocking in the wind and will support the boat if a cable were to break. These measures should be sufficient to safeguard your boat lift as long as the underlying dock structure and pilings are not damaged.

We recently wrote about a customer of ours that had a neat idea to protect his elevator-style boat lift during the Michigan winter. He safely stores his boat on land during winter and uses our custom engineered pivoting brackets to lift the elevator tracks out of the water for winter storage. What a great way to prevent track damage from the ice.

How To Protext Your Boat Lift during the winter

How To Protect Your Boat

Nobody knows how to better protect your boat than the insurance experts at BoatUS. Please check out their complete guide to winterizing your boat. It is really well written and thorough.

Tip for Winterizing Your Boat

Here’s looking forward to Spring so that we can begin boating again.

Boat Lift Maintenance

White boat with navy covering is held above the water for Boat Lift Maintenance

The convenience of a boat lift can make any captains experience extra luxurious, but only if the lift is operable.  You need to perform regular maintenance on your boat lift to make sure it continues to work properly.  Proper maintenance will ensure that your lift performs as expected for many years to come.  Ignoring routine maintenance may damage your lift, resulting in difficult and costly repairs.  In this article, we will go over general boat lift maintenance suitable to any manufacturer as well as the maintenance procedures for the IMM Quality lineup of boat lifts.

Regular boat lift maintenance is important.


General Boat Lift Maintenance Procedures

Lift Cables – Make sure to inspect your lift cables regularly for any signs of wear and to see if they are winding properly.  Rust spots, broken strands, fraying, kinks and abnormalities are all signs that you may need to replace your cables.  If you notice any signs of wear, contact a professional marine contractor ASAP and have an expert inspect them to see if you need a cable replacement.

Every time you use the lift, it is important to make sure you wash the cables with fresh water after you have finished using the lift.  Saltwater will corrode the cables and dramatically reduce their lifespan if they are not rinsed off properly.

You may choose to lubricate your lift cables with a penetrating oil like Lubriplate’s Chain and Cable Fluid Penetrating Oil (Part No. L0135-063).  Individual strands inside the cable move and rub against one another during normal operation which causes abrasive wear on the inside and outside of the cable.   Penetrating chain and cable lubricants provide corrosion protection and lubrication to the core inside strands, the exterior surfaces and also wash off the external surfaces to remove contaminants and dirt.  Proper lubrication can greatly increase cable life.

Manufacturers of stainless steel cables recommend cable replacement after two years of normal use, even without signs of wear.  Failure to properly maintain your lift cables may cause a catastrophic failure resulting in damage to your lift and dock, damage to your boat and / or severe injury.  Please do not take chances over-extending the life of your cables.

Don't let this happen to you. Check your cables!
Don’t let this happen to you. Check your cables!


Lift Beams – Every time you use your lift you should rinse the lift beams with fresh water to rid them of any salt and any potential barnacle growth.  When lift beams are not cared for and rinsed routinely, the salt and barnacles build up, causing the beams to corrode and weaken at a much faster rate.  The best way to reduce wear from salt water, barnacle growth and electrolysis is to keep your lift beams out of the water as much as possible when not in use.


Don't forget to wash your cables and cradle beams too.
Don’t forget to wash your cables and cradle beams too.


Bunks – Make sure to regularly check the bunks for any tears or worn out areas in the carpet.  Also examine the wood for broken, cracked or rotted areas.  Examine the bunk brackets for cracks and signs of wear.  Adjust the position of the bunk brackets, if necessary, and make sure all hardware is tightened.  Due to their frequent use and exposure to water, your carpeted wood bunks will need periodic replacing.

Cracked bunks and rusty galvanized cradles.


Gearbox and Drive Units – Check all gears monthly and make sure they are well greased.  You do not want to have a drive unit seize because there wasn’t enough grease.  If you have a flat plat drive, remove the covers and check to make sure that the belts are not loose, broken or frayed.  If any of these signs are visible, it is strongly recommended that you have the belts replaced immediately.  Also, check the alignment of the belt and adjust if necessary.

Typical flat plate drive.


Examine the motors for signs of rust, paying special attention to the capacitor cover.  If the motors are not under a cover, look to see if the motor is retaining water.  Make sure the top-side drain holes are closed and the bottom-side drain holes are open to keep out debris and allow proper drainage.  High-quality American made motors typically last 7-10 years when under a cover.  It has been our experience that Chinese made stainless steel motors last 1-2 years when exposed without a cover.


Pulleys – Be sure to check your sheaves (pulleys) for grease.  If the sheaves and bolts are not greased every 4 to 6 months (depending on use) the friction between the sheaves and the sheave mounts will increase, causing the sheaves to squeak and eventually seize up.  Be sure to check the nuts and bolts and make sure they are nice and tight.  One loose bolt could cause havoc.

What happens to sheave bolts without proper lubrication. New vs old bolt.


Drive Pipe Bearing Block – Every 4 to 6 months, make sure to grease all of your grease points so your motors are able to operate at their optimal performance.  Lack of grease causes more friction between the drive pipe and bearing which will increase the potential for failure.  If your bearing blocks are bolted to the top beams, make sure all the nuts and bolts are tight.


Wired Zincs – If you have an elevator style lift, confirm that the wired zincs are submerged underwater at all times.  Inspect the zincs and replace if they are more than 50% worn.


Maintenance Instructions for IMM Quality Boat Lifts

IMM Quality Boat Lifts prides itself on building extremely durable and low maintenance lift systems.  We use higher quality materials and maintenance-free components to save you time and money.  Please refer to the Owner’s manuals for more detailed instructions for your specific lift.  Here are a few helpful tips to ensure your boat lift is working properly and to prolong its life.

Lift Cables – Follow the general procedures for any boat lift described above.

Lift Beams – Follow the general procedures for any boat lift described above.

Bunks – Our Platinum and Superlifts come with aluminum bunks covered in non-marring white vinyl.  Our UV resistant bunks are guaranteed not to float and are covered by a 10 year warranty against tearing, fading, mold and corrosion.

Drive Units – On the Alumavator chain drive and Superlift, either remove the cover or use the access port on the back plate to lubricate the chain and sprocket with roller chain lubricant (ie. Schaeffer’s #227 Moly roller chain lube) every 6 months.  The Platinum drive system is maintenance-free.  No adding or changing lubrication is necessary.  None of our drive systems have any belts to adjust or replace.  All of our drive systems have covers, so no maintenance of the American made motors is required.

Pulleys – On all our lifts, our pulley bearings are maintenance-free, no lubrication is necessary.

Drive Pipe Bearing Block – On all our lifts, our drive pipe bearings are maintenance-free, no lubrication is necessary.

Wired Zincs – Follow the general procedures for any boat lift described above.


Following these helpful tips will ensure that you will get the most life out of your boat lift, help you save money and enjoy more time out on the water.  If you don’t have the time or would rather leave it up to someone who knows all about boat lift maintenance, we have a friendly, knowledgeable service department who will be more than happy to answer questions and put you in contact with a local service provider to make sure your boat lift is running at its peak performance.  Give us a call today at 800-545-5603.